本文使用的開發環境為 Visual Studio 2019 Community Edition。
範例程式碼下載:https://github.com/riddleling/HelloWin32
第一部分:起步走
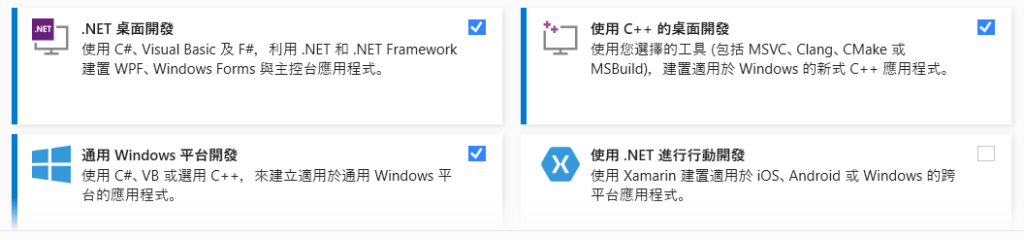
打開 Visual Studio Installer,勾選安裝「使用 C++ 的桌面開發」、「通用 Windows 平台開發」:
在 Manage Extensions 裡搜尋「C++/WinRT templates and visualizer for VS2019」並安裝之:

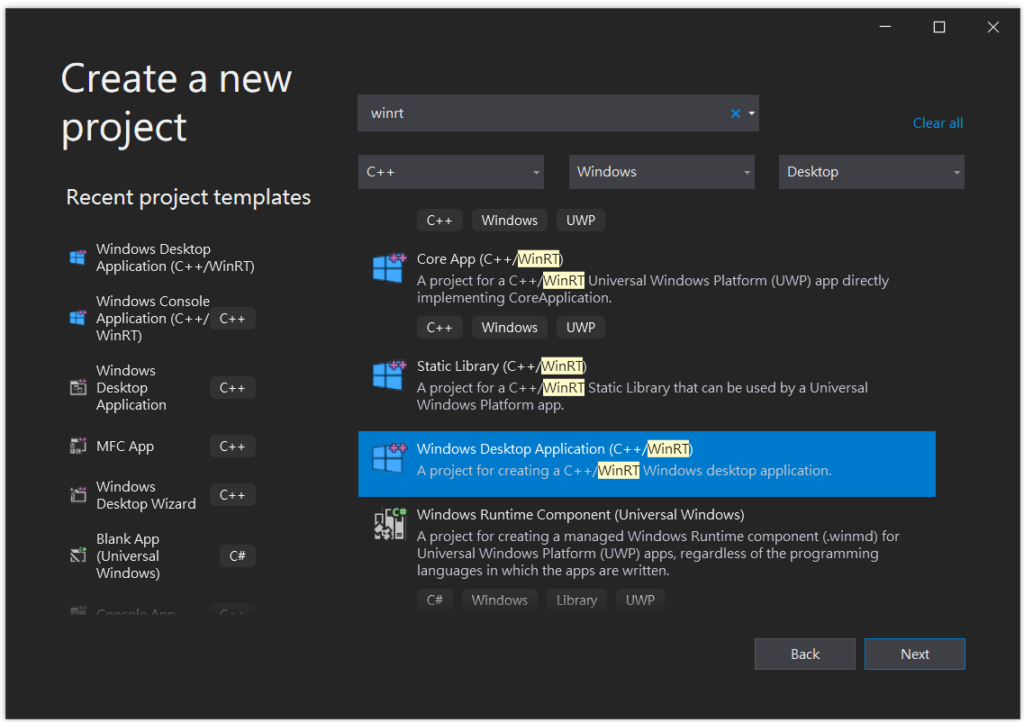
重新啟動 Visual Studio 2019 後,選擇 Create a new project,然後建立一個「Windows Desktop Application (C++/WinRT)」專案。
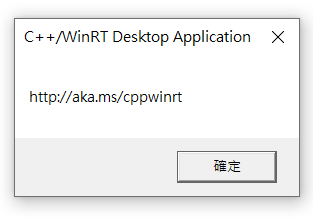
「Windows Desktop Application (C++/WinRT)」 範本產生的程式碼是用 Win32 的 MessageBox 跟 UWP 的 Windows.Foundation.Uri 顯示一個對話框。
不過,專案剛建立好時,會看到有「cannot open source file “winrt/Windows.XXXXX.h”」等錯誤訊息,如下圖所示:
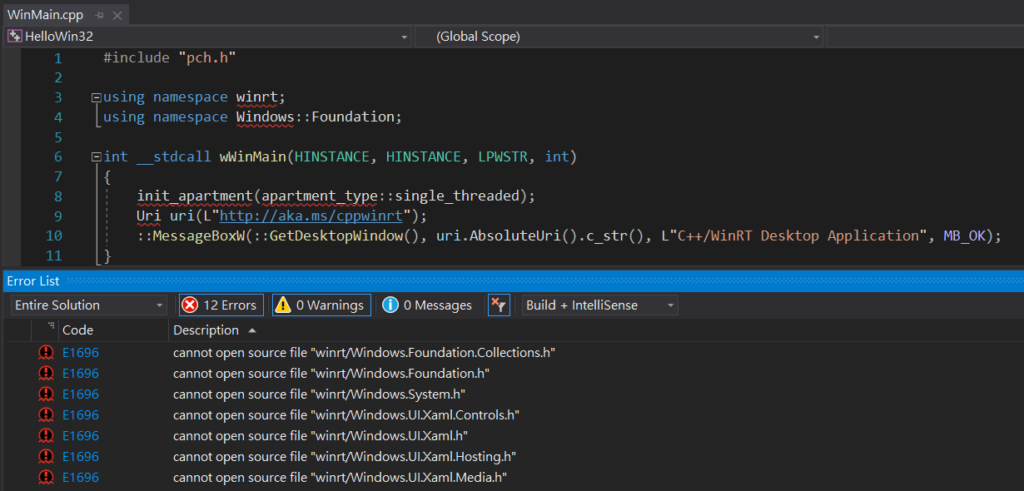
雖然有不能開啟 WinRT 標頭檔的錯誤訊息,但是按下 F5 編譯執行是可以通過編譯並正常執行的,這會是 Visual Studio 2019 的 bug 嗎?這時候把 Visual Studio 關閉重開,重新開啟建立好的那個專案,「cannot open source file “winrt/Windows.XXXXX.h”」的錯誤訊息就會不見了,真奇怪。總之,我遇到出現這種「cannot open source file “winrt/Windows.XXXXX.h”」的錯誤訊息時,會先編譯執行一次,關閉 Visual Studio,再重新開啟專案,這種錯誤訊息就會不見了。 (真的很怪吧)
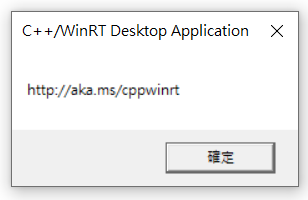
範本產生的程式碼是顯示一個對話框,讓我們編譯執行看看。如下圖,可以看到對話框內的文字跟按鈕上的文字都糊糊的,這要回溯到 Win32 出現的那個年代,那時大部分的螢幕都是 96 DPI,所以 Win32 預設的 DPI 為 96。不過現代螢幕幾乎都是高 DPI,所以 Windows 後來加入了 DPI 感知模式 (DPI Awareness Mode),Win32 程式需要宣告自身是否為 DPI 感知的程式,如果沒有宣告為 DPI 感知程式, Windows 會先用 96 DPI 去繪製程式,然後再依照目前螢幕的 DPI 去放大程式畫面,所以才會看起來糊糊的。
要把程式宣告為 DPI 感知很簡單,從 Solution Explorer 找到名稱格式為 <專案名稱>.exe.manifest 的檔案 (例如:我的專案名稱是 HelloWin32,所以該檔案的名稱會是 HelloWin32.exe.manifest),然後把內容修改如下:
<?xml version="1.0" encoding="UTF-8" standalone="yes"?>
<assembly xmlns="urn:schemas-microsoft-com:asm.v1" manifestVersion="1.0" xmlns:asmv3="urn:schemas-microsoft-com:asm.v3">
  <asmv3:application>
    <asmv3:windowsSettings>
      <dpiAware xmlns="http://schemas.microsoft.com/SMI/2005/WindowsSettings">true</dpiAware>
      <dpiAwareness xmlns="http://schemas.microsoft.com/SMI/2016/WindowsSettings">PerMonitorV2</dpiAwareness>
    </asmv3:windowsSettings>
  </asmv3:application>
</assembly>
修改完 manifest 檔案後,重新編譯執行,可以看到文字不會糊糊的了:
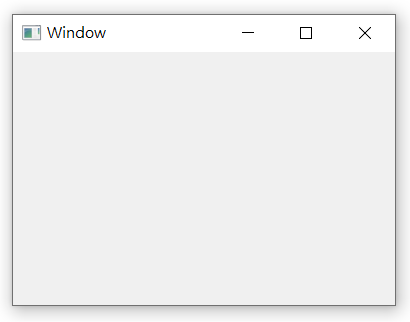
接下來,我們來寫一個視窗程式吧,修改 WinMain.cpp,內容如下:
#include "pch.h"

using namespace winrt;
using namespace Windows::Foundation;

LRESULT CALLBACK WndProc(HWND, UINT, WPARAM, LPARAM);

int WINAPI wWinMain(
    _In_ HINSTANCE hInstance,
    _In_opt_ HINSTANCE,
    _In_ LPWSTR,
    _In_ int)
{
    init_apartment(apartment_type::single_threaded);

    LPCWSTR lpszClassName = L"MainWindow";
    LPCWSTR lpWindowName = L"Window";  // window title

    WNDCLASSW wc{};
    wc.style = CS_HREDRAW | CS_VREDRAW;
    wc.cbClsExtra = 0;
    wc.cbWndExtra = 0;
    wc.lpszClassName = lpszClassName;
    wc.hInstance = hInstance;
    wc.hbrBackground = GetSysColorBrush(COLOR_3DFACE);
    wc.lpszMenuName = nullptr;
    wc.lpfnWndProc = WndProc;
    wc.hCursor = LoadCursor(nullptr, IDC_ARROW);
    wc.hIcon = LoadIcon(nullptr, IDI_APPLICATION);

    RegisterClassW(&wc);

    HWND hWnd = CreateWindowExW(
        0,
        wc.lpszClassName,
        lpWindowName,
        WS_OVERLAPPEDWINDOW | WS_VISIBLE,
        100, 100, 400, 300,  // x, y, width, height
        nullptr,
        nullptr,
        hInstance,
        nullptr
    );

    ShowWindow(hWnd, SW_SHOWNORMAL);
    UpdateWindow(hWnd);

    MSG msg;
    while (GetMessage(&msg, NULL, 0, 0)) {
        TranslateMessage(&msg);
        DispatchMessage(&msg);
    }
    return (int)msg.wParam;
}

LRESULT CALLBACK WndProc(HWND hwnd, UINT msg, WPARAM wParam, LPARAM lParam)
{
    switch (msg) {
    case WM_DESTROY: {
        PostQuitMessage(0);
    } break;
    }
    return DefWindowProcW(hwnd, msg, wParam, lParam);
}
然後刪除 pch.h 裡有 Windows.UI 的那幾行:
#pragma once

#include <windows.h>
#ifdef GetCurrentTime
#undef GetCurrentTime
#endif
#include <winrt/Windows.Foundation.h>
#include <winrt/Windows.Foundation.Collections.h>
#include <winrt/Windows.System.h>
#include <winrt/Windows.UI.Xaml.h>            //<-- 刪除這行
#include <winrt/Windows.UI.Xaml.Controls.h>   //<-- 刪除這行
#include <winrt/Windows.UI.Xaml.Hosting.h>    //<-- 刪除這行
#include <winrt/Windows.UI.Xaml.Media.h>      //<-- 刪除這行
#include <Windows.UI.Xaml.Hosting.DesktopWindowXamlSource.h>  //<-- 刪除這行
編譯執行,畫面如下:
不過,這個視窗的大小其實不正確。如前面所述,現代螢幕都是高 DPI,而 Win32 預設是用 96 DPI,所以還需要加入判斷 DPI 的程式碼才行。在 Win32 裡,可以用 GetDpiForWindow 函數取得當前的 DPI 值,然後用 MulDiv 函數計算出實際的座標與尺寸值。
在 WinMain.cpp 裡添加以下這個函數:
void SetWindowSize(HWND hWnd)
{
    int dpi = GetDpiForWindow(hWnd);
    int dpiScaledX = MulDiv(100, dpi, 96);  // x
    int dpiScaledY = MulDiv(100, dpi, 96);  // y
    int dpiScaledW = MulDiv(400, dpi, 96);  // width
    int dpiScaledH = MulDiv(300, dpi, 96);  // height

    SetWindowPos(
        hWnd,
        hWnd,
        dpiScaledX,
        dpiScaledY,
        dpiScaledW,
        dpiScaledH,
        SWP_NOZORDER | SWP_NOACTIVATE
    );
}
修改 WndProc 函數的內容,加入處理 WM_CREATE 訊息的區塊,並呼叫 SetWindowSize 函數:
LRESULT CALLBACK WndProc(HWND hwnd, UINT msg, WPARAM wParam, LPARAM lParam)
{
    switch (msg) {
    case WM_CREATE: {
        SetWindowSize(hwnd);  // 設定 Window 的起始座標與尺寸
    } break;
    case WM_DESTROY: {
        PostQuitMessage(0);
    } break;
    }
    return DefWindowProcW(hwnd, msg, wParam, lParam);
}
修改 CreateWindowExW 函數的傳入參數,把 x、y、width、height 都改成 0:
HWND hWnd = CreateWindowExW(
    0,
    wc.lpszClassName,
    lpWindowName,
    WS_OVERLAPPEDWINDOW | WS_VISIBLE,
    0, 0, 0, 0,   // 這裡四個值都改成 0
    nullptr,
    nullptr,
    hInstance,
    nullptr
);
重新編譯執行,這時的視窗大小應該是正確的了。
接下來,讓我們在視窗上加入一個 Label 跟 Button。加入的子視窗控制項一樣需要判斷 DPI,並計算實際的座標與尺寸值。在 WinMain.cpp 加入以下兩個函數:
void SetLabelPos(HWND hWnd, HWND hLabel)
{
    int dpi = GetDpiForWindow(hWnd);
    int dpiScaledX = MulDiv(40, dpi, 96);
    int dpiScaledY = MulDiv(40, dpi, 96);
    int dpiScaledW = MulDiv(200, dpi, 96);
    int dpiScaledH = MulDiv(30, dpi, 96);

    SetWindowPos(
        hLabel,
        hLabel,
        dpiScaledX,
        dpiScaledY,
        dpiScaledW,
        dpiScaledH,
        SWP_NOZORDER | SWP_NOACTIVATE
    );
}

void SetButtonPos(HWND hWnd, HWND hButton)
{
    int dpi = GetDpiForWindow(hWnd);
    int dpiScaledX = MulDiv(40, dpi, 96);
    int dpiScaledY = MulDiv(80, dpi, 96);
    int dpiScaledW = MulDiv(100, dpi, 96);
    int dpiScaledH = MulDiv(28, dpi, 96);

    SetWindowPos(
        hButton,
        hButton,
        dpiScaledX,
        dpiScaledY,
        dpiScaledW,
        dpiScaledH,
        SWP_NOZORDER | SWP_NOACTIVATE
    );
}
修改 WndProc 函數的內容,在 WM_CREATE 訊息的區塊裡,建立一個 Label 跟 Button:
LRESULT CALLBACK WndProc(HWND hwnd, UINT msg, WPARAM wParam, LPARAM lParam)
{
    switch (msg) {
    case WM_CREATE: {
        SetWindowSize(hwnd);

        // 建立一個 Label:
        HWND hLabel = CreateWindowW(
            L"static",
            L"This is a label.",
            WS_VISIBLE | WS_CHILD,
            0, 0, 0, 0,
            hwnd,
            (HMENU)ID_LABEL,
            nullptr,
            nullptr
        );
        if (hLabel) {
            // 設定 Label 的座標與尺寸:
            SetLabelPos(hwnd, hLabel);
        }

        // 建立一個 Button:
        HWND hButton = CreateWindowW(
            L"Button",
            L"Say hello",
            WS_VISIBLE | WS_CHILD,
            0, 0, 0, 0,
            hwnd,
            (HMENU)ID_BUTTON,
            nullptr,
            nullptr
        );
        if (hButton) {
            // 設定 Button 的座標與尺寸:
            SetButtonPos(hwnd, hButton);
        }
    } break;

    // 下略...
在 WinMain.cpp 的上方,定義子視窗控制項的 ID:
#include "pch.h"
using namespace winrt;
using namespace Windows::Foundation;
// 定義子視窗的 ID:
#define ID_LABEL 10
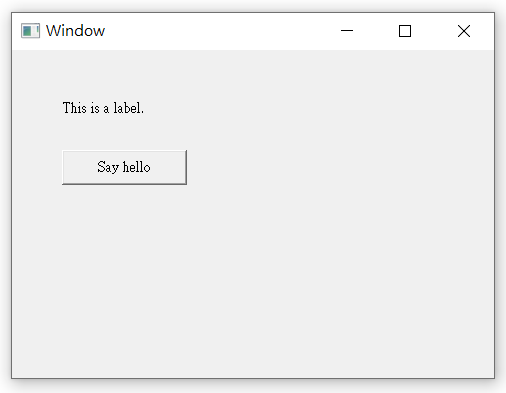
#define ID_BUTTON 11編譯執行,畫面如下:
Label 跟 Button 的字型看起來有點醜,來修改一下字型吧,在 WinMain.cpp 裡加入以下函數:
BOOL CALLBACK EnumChildProc(HWND hWnd, LPARAM)
{
    HFONT hfDefault = (HFONT)GetStockObject(DEFAULT_GUI_FONT);  // 系統預設的字型
    SendMessage(hWnd, WM_SETFONT, (WPARAM)hfDefault, MAKELPARAM(TRUE, 0));
    return TRUE;
}
然後在執行 ShowWindow 函數後,執行 EnumChildWindows 函數,如下所示:
ShowWindow(hWnd, SW_SHOWNORMAL);
EnumChildWindows(hWnd, EnumChildProc, 0); // 加入這行
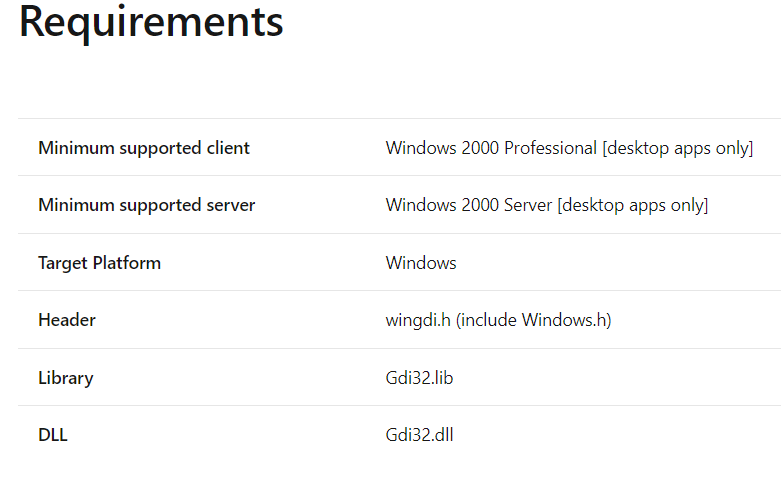
UpdateWindow(hWnd);編譯執行,這時出現了「LNK2019 unresolved external symbol」的錯誤訊息,如下圖:

看來是連結時缺少了包含 GetStockObject 函數的 Library。從微軟的文件得知,GetStockObject 函數需要連結到 Gdi32.lib:
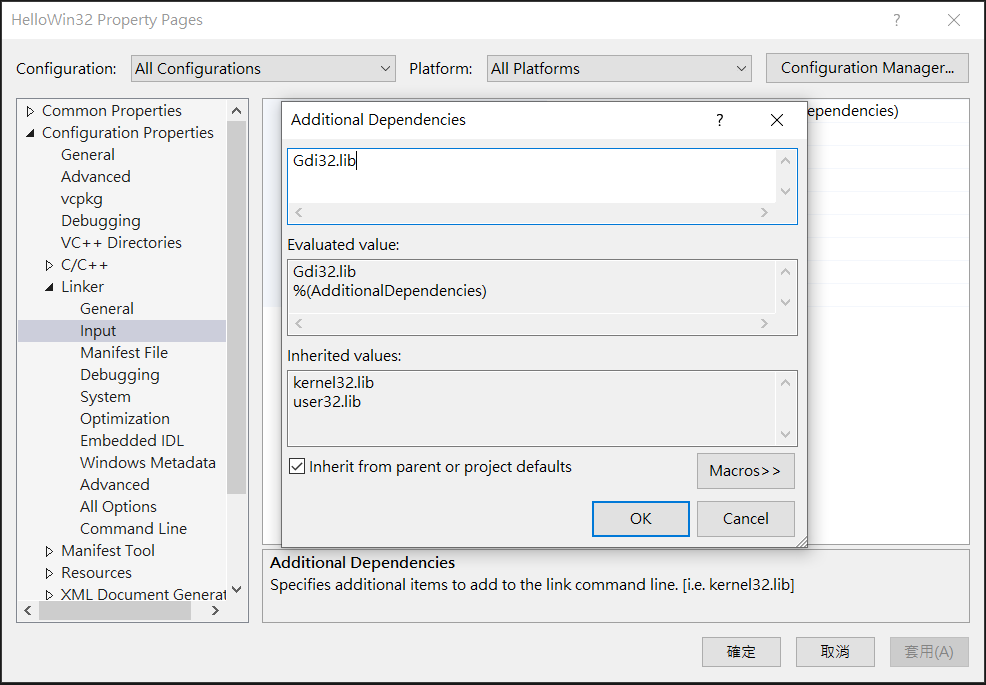
從選單列選擇:Project -> <專案名稱> Properties,然後選擇 Configuration Properties -> Linker -> Input。上方的 Configuration 下拉式方塊 (Combo Box) 選擇「All Configuration 」,Platform 下拉式方塊選擇「All Platform」。然後修改 Additional Dependencies 的內容:
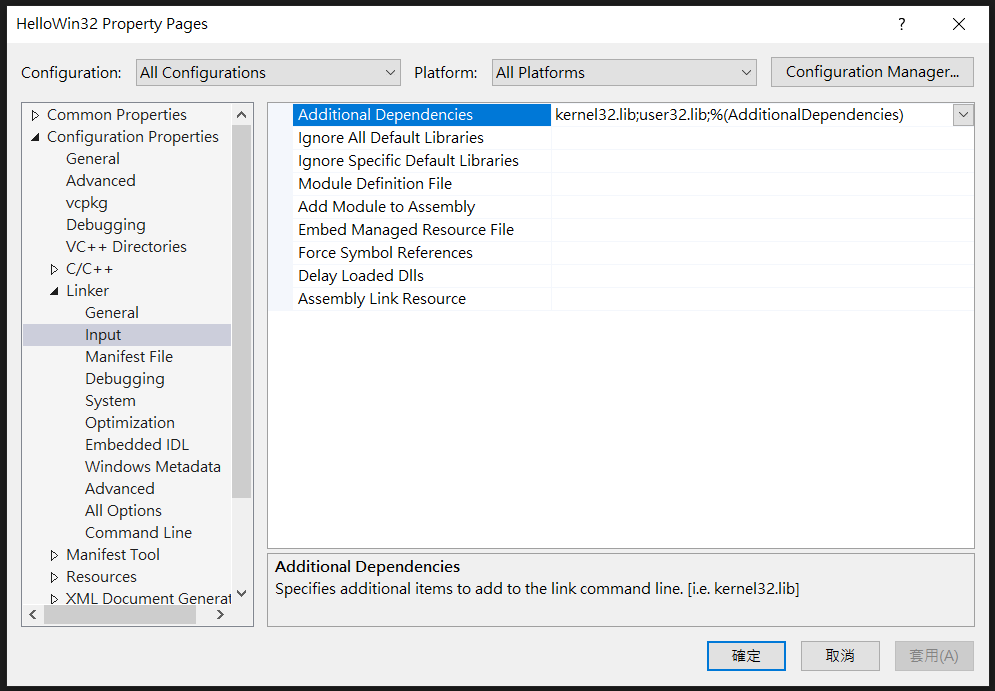
加入 Gdi32.lib,勾選 Inherit from parent or project defaults,按下 OK 按鈕:
再次編譯執行,文字的部分有比較好看一些了:
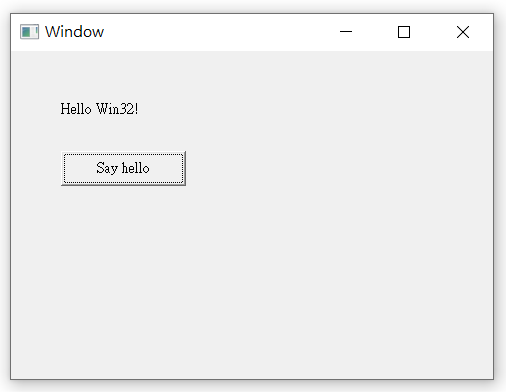
接下來要幫這個程式加上一個功能:按下 Say hello 按鈕時,Label 的文字會變成「Hello Win32!」。
先在 WinMain.cpp 加入兩個 HWND 全域變數,用來儲存 Label 跟 Button 的 handle 值:
#include "pch.h"

using namespace winrt;
using namespace Windows::Foundation;

#define ID_LABEL   10
#define ID_BUTTON  11

// 加入這兩個全域變數:
HWND hLabel  = nullptr;
HWND hButton = nullptr;
修改 WndProc 函數的內容,把 hLabel 跟 hButton 前的 HWND 宣告移除,並加入處理 WM_COMMAND 訊息的區塊:
LRESULT CALLBACK WndProc(HWND hwnd, UINT msg, WPARAM wParam, LPARAM lParam)
{
    switch (msg) {
    case WM_CREATE: {
        SetWindowSize(hwnd);

        hLabel = CreateWindowW(  // 移除 HWND 宣告,handle 值改成儲存到全域變數 hLabel 裡
            L"static",
            L"This is a label.",
            WS_VISIBLE | WS_CHILD,
            0, 0, 0, 0,
            hwnd,
            (HMENU)ID_LABEL,
            nullptr,
            nullptr
        );
        if (hLabel) {
            SetLabelPos(hwnd, hLabel);
        }

        hButton = CreateWindowW(  // 移除 HWND 宣告,handle 值改成儲存到全域變數 hButton 裡
            L"Button",
            L"Say hello",
            WS_VISIBLE | WS_CHILD,
            0, 0, 0, 0,
            hwnd,
            (HMENU)ID_BUTTON,
            nullptr,
            nullptr
        );
        if (hButton) {
            SetButtonPos(hwnd, hButton);
        }
    } break;
    case WM_COMMAND: {  // 加入處理 WM_COMMAND 訊息的區塊:
        if (LOWORD(wParam) == ID_BUTTON) {
            if (hLabel) {
                SetWindowTextW(hLabel, L"Hello Win32!");
            }
        }
    } break;

    // 下略...
在處理 WM_COMMAND 訊息的區塊裡,判斷訊息是否來自 Say hello 按鈕 (ID_BUTTON),如果是,就把 Label 的文字改成「Hello Win32!」:
case WM_COMMAND: {
    if (LOWORD(wParam) == ID_BUTTON) {
        if (hLabel) {
            SetWindowTextW(hLabel, L"Hello Win32!");
        }
    }
} break;
編譯執行,按下 Say hello 按鈕,畫面如下:
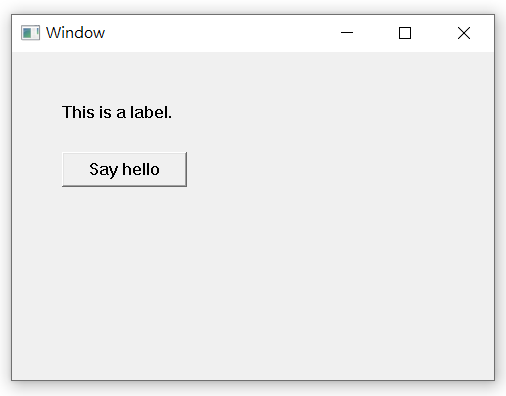
第二部分:用物件導向的方式重構程式
用全域變數儲存子視窗控制項 handle 值的方式看起來不是很漂亮,讓我們利用 C++ 的物件導向功能來修改這個程式吧。
在 Solution Explorer 裡的 Source Files 按下滑鼠右鍵,選擇 Add -> New Item…:
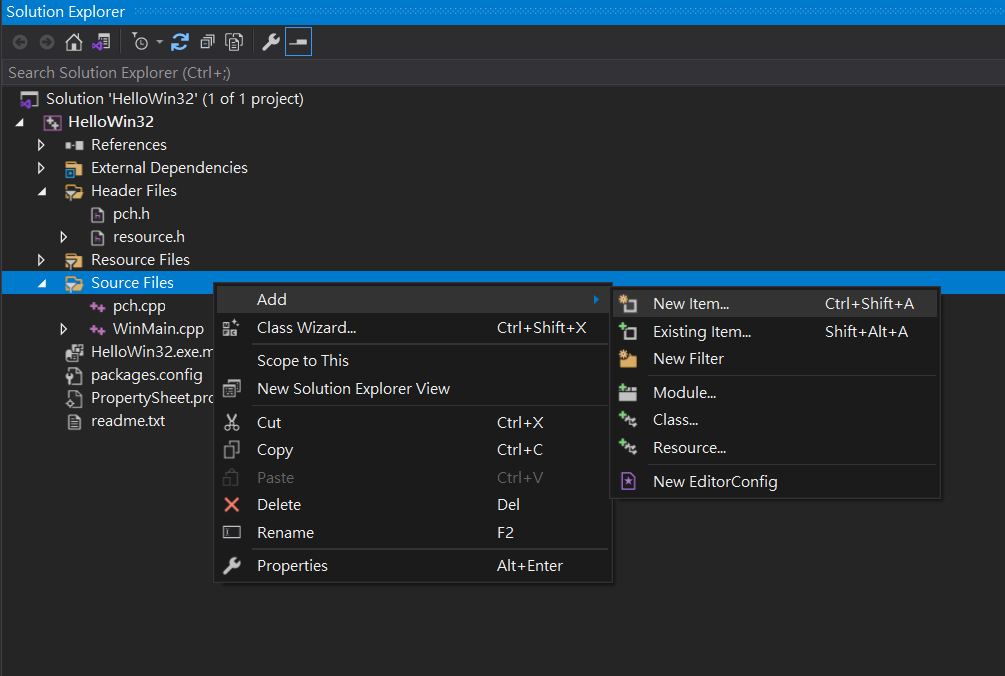
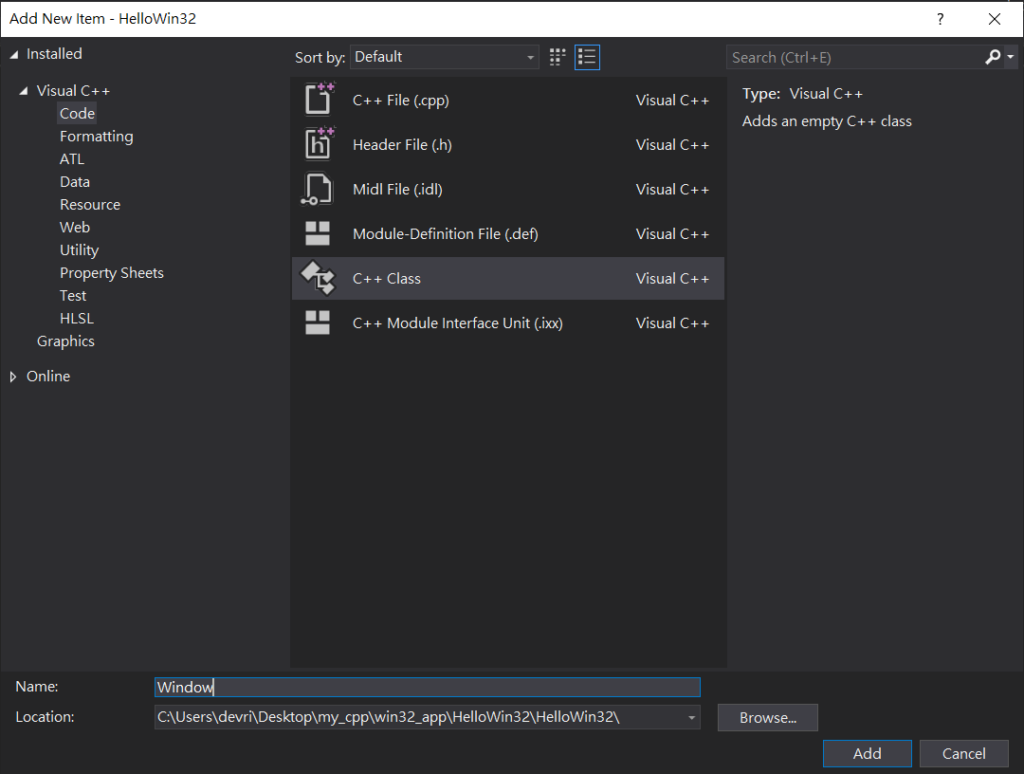
選擇 Visual C++ -> Code -> C++ Class,下方的 Name 輸入 Window,按下 Add 按鈕:
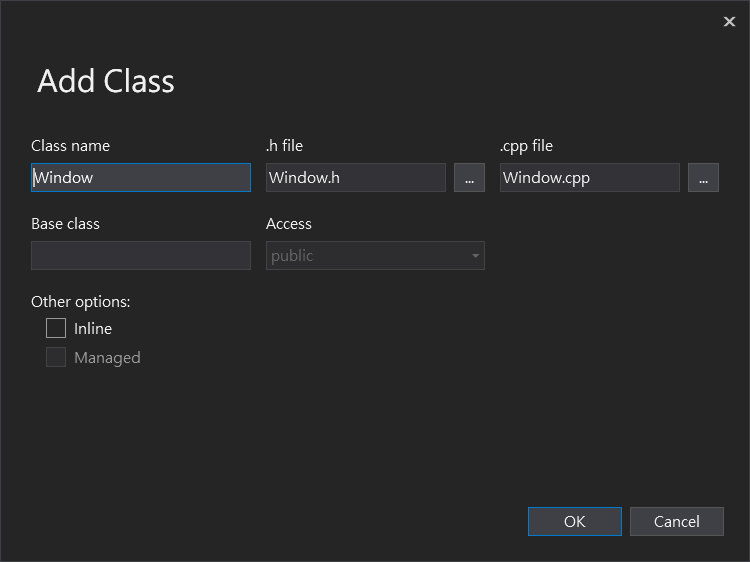
按下 OK 按鈕:
編輯 Window.h 檔案,把內容改成如下:
#pragma once

class Window final
{
public:
	Window(HINSTANCE hInstance, LPCWSTR lpszClassName, LPCWSTR lpWindowName);

private:
	static LRESULT CALLBACK WndProc(HWND hwnd, UINT msg, WPARAM wParam, LPARAM lParam);
	static BOOL CALLBACK EnumChildProc(HWND hWnd, LPARAM);

	HWND hWnd_;
	HWND hLabel_;
	HWND hButton_;

	void SetWindowSize();
	void SetLabelPos();
	void SetButtonPos();
	void SayHello();
};
編輯 Window.cpp,內容改成如下:
#include "pch.h"
#include "Window.h"

#define ID_LABEL   10
#define ID_BUTTON  11

Window::Window(HINSTANCE hInstance, LPCWSTR lpszClassName, LPCWSTR lpWindowName)
{
}

LRESULT CALLBACK Window::WndProc(HWND hwnd, UINT msg, WPARAM wParam, LPARAM lParam)
{
}

BOOL CALLBACK Window::EnumChildProc(HWND hWnd, LPARAM)
{
}

void Window::SetWindowSize()
{
}

void Window::SetLabelPos()
{
}

void Window::SetButtonPos()
{
}

void Window::SayHello()
{
}
在 Window Class 裡,設了三個 HWND 私有變數來儲存主視窗跟子視窗控制項的 handle 值。WndProc 跟 EnumChildProc 這兩個 CALLBACK 函數必須是 Class 的靜態函數。
接下來,把原本寫在 WinMain.cpp 的程式邏輯移到 Window Class 裡。
編輯 Window.cpp,在 Window::Window 建構函數裡加入以下內容:
Window::Window(HINSTANCE hInstance, LPCWSTR lpszClassName, LPCWSTR lpWindowName)
{
    hLabel_  = nullptr;
    hButton_ = nullptr;

    WNDCLASSW wc{};
    wc.style = CS_HREDRAW | CS_VREDRAW;
    wc.cbClsExtra = 0;
    wc.cbWndExtra = 0;
    wc.lpszClassName = lpszClassName;
    wc.hInstance = hInstance;
    wc.hbrBackground = GetSysColorBrush(COLOR_3DFACE);
    wc.lpszMenuName = nullptr;
    wc.lpfnWndProc = WndProc;
    wc.hCursor = LoadCursor(nullptr, IDC_ARROW);
    wc.hIcon = LoadIcon(nullptr, IDI_APPLICATION);

    RegisterClassW(&wc);

    hWnd_ = CreateWindowExW(
        0,
        wc.lpszClassName,
        lpWindowName,
        WS_OVERLAPPEDWINDOW | WS_VISIBLE,
        0, 0, 0, 0,
        nullptr,
        nullptr,
        hInstance,
        this      // 這裡要傳入 this
    );

    ShowWindow(hWnd_, SW_SHOWNORMAL);
    EnumChildWindows(hWnd_, EnumChildProc, 0);
    UpdateWindow(hWnd_);
}
Window::Window 建構函數負責建立主視窗。注意:CreateWindowExW 函數的最後一個參數要改成 this。
把 WinMain.cpp 裡的 EnumChildProc 函數的內容移到 Window::EnumChildProc 函數裡:
BOOL CALLBACK Window::EnumChildProc(HWND hWnd, LPARAM)
{
    HFONT hfDefault = (HFONT)GetStockObject(DEFAULT_GUI_FONT);
    SendMessage(hWnd, WM_SETFONT, (WPARAM)hfDefault, MAKELPARAM(TRUE, 0));
    return TRUE;
}
把 WinMain.cpp 裡的 WndProc 函數的內容移到 Window::WndProc 函數裡,並修改如下:
LRESULT CALLBACK Window::WndProc(HWND hwnd, UINT msg, WPARAM wParam, LPARAM lParam)
{
    Window* pThis = nullptr;

    if (msg == WM_NCCREATE) {
        CREATESTRUCT* pCreate = reinterpret_cast<CREATESTRUCT*>(lParam);
        pThis = reinterpret_cast<Window*>(pCreate->lpCreateParams);
        SetWindowLongPtr(hwnd, GWLP_USERDATA, (LONG_PTR)pThis);
        pThis->hWnd_ = hwnd;
    }
    else {
        LONG_PTR ptr = GetWindowLongPtr(hwnd, GWLP_USERDATA);
        pThis = reinterpret_cast<Window*>(ptr);
    }

    switch (msg) {
    case WM_CREATE: {
        pThis->SetWindowSize();

        pThis->hLabel_ = CreateWindowW(
            L"static",
            L"This is a label.",
            WS_VISIBLE | WS_CHILD,
            0, 0, 0, 0,
            hwnd,
            (HMENU)ID_LABEL,
            nullptr,
            nullptr
        );
        if (pThis->hLabel_) {
            pThis->SetLabelPos();
        }

        pThis->hButton_ = CreateWindowW(
            L"Button",
            L"Say hello",
            WS_VISIBLE | WS_CHILD,
            0, 0, 0, 0,
            hwnd,
            (HMENU)ID_BUTTON,
            nullptr,
            nullptr
        );
        if (pThis->hButton_) {
            pThis->SetButtonPos();
        }
    } break;
    case WM_COMMAND: {
        if (LOWORD(wParam) == ID_BUTTON) {
            pThis->SayHello();
        }
    } break;
    case WM_DESTROY: {
        PostQuitMessage(0);
    } break;
    }
    return DefWindowProcW(hwnd, msg, wParam, lParam);
}
Window::WndProc 函數的內容說明:
Window::WndProc 函數一開始需要先取得 Window Class 實例的指標。我們在建立主視窗時, CreateWindowExW 函數的最後一個參數是傳入 this (把 Window Class 實例的指標傳給 CreateWindowExW),現在我們可以透過 WM_NCCREATE 訊息把這個指標取出來。
WM_NCCREATE 訊息的 lParam 參數是一個 CREATESTRUCT 結構的指標,CREATESTRUCT 結構包含著我們傳給 CreateWindowExW 函數的指標,透過 reinterpret_cast 轉型取得了 this 指標後,再用 SetWindowLongPtr 函數把 this 指標儲存在主視窗的實例資料裡:
Window* pThis = nullptr;

if (msg == WM_NCCREATE) {
    CREATESTRUCT* pCreate = reinterpret_cast<CREATESTRUCT*>(lParam);
    pThis = reinterpret_cast<Window*>(pCreate->lpCreateParams);
    SetWindowLongPtr(hwnd, GWLP_USERDATA, (LONG_PTR)pThis);
    pThis->hWnd_ = hwnd;
}
else {
    // 下略...
把 this 指標儲存在主視窗的實例資料裡後,之後就可以透過 GetWindowLongPtr 函數來取回 this 指標:
Window* pThis = nullptr;

if (msg == WM_NCCREATE) {
    // 略...
}
else {
    LONG_PTR ptr = GetWindowLongPtr(hwnd, GWLP_USERDATA);
    pThis = reinterpret_cast<Window*>(ptr);
}
之後的訊息處理程式碼就可以透過 pThis 來存取 Window Class 實例的成員變數或是呼叫成員函數:
switch (msg) {
case WM_CREATE: {
    pThis->SetWindowSize();

    pThis->hLabel_ = CreateWindowW(
        L"static",
        L"This is a label.",
        WS_VISIBLE | WS_CHILD,
        0, 0, 0, 0,
        hwnd,
        (HMENU)ID_LABEL,
        nullptr,
        nullptr
    );
    if (pThis->hLabel_) {
        pThis->SetLabelPos();
    }

    pThis->hButton_ = CreateWindowW(
        L"Button",
        L"Say hello",
        WS_VISIBLE | WS_CHILD,
        0, 0, 0, 0,
        hwnd,
        (HMENU)ID_BUTTON,
        nullptr,
        nullptr
    );
    if (pThis->hButton_) {
        pThis->SetButtonPos();
    }
} break;
case WM_COMMAND: {
    if (LOWORD(wParam) == ID_BUTTON) {
        pThis->SayHello();
    }
} break;
把 Window Class 剩下的成員函數的內容補完:
void Window::SetWindowSize()
{
    int dpi = GetDpiForWindow(hWnd_);
    int dpiScaledX = MulDiv(100, dpi, 96);
    int dpiScaledY = MulDiv(100, dpi, 96);
    int dpiScaledW = MulDiv(400, dpi, 96);
    int dpiScaledH = MulDiv(300, dpi, 96);
    SetWindowPos(
        hWnd_,
        hWnd_,
        dpiScaledX,
        dpiScaledY,
        dpiScaledW,
        dpiScaledH,
        SWP_NOZORDER | SWP_NOACTIVATE
    );
}

void Window::SetLabelPos()
{
    int dpi = GetDpiForWindow(hWnd_);
    int dpiScaledX = MulDiv(40, dpi, 96);
    int dpiScaledY = MulDiv(40, dpi, 96);
    int dpiScaledW = MulDiv(200, dpi, 96);
    int dpiScaledH = MulDiv(30, dpi, 96);

    SetWindowPos(
        hLabel_,
        hLabel_,
        dpiScaledX,
        dpiScaledY,
        dpiScaledW,
        dpiScaledH,
        SWP_NOZORDER | SWP_NOACTIVATE
    );
}

void Window::SetButtonPos()
{
    int dpi = GetDpiForWindow(hWnd_);
    int dpiScaledX = MulDiv(40, dpi, 96);
    int dpiScaledY = MulDiv(80, dpi, 96);
    int dpiScaledW = MulDiv(100, dpi, 96);
    int dpiScaledH = MulDiv(28, dpi, 96);

    SetWindowPos(
        hButton_,
        hButton_,
        dpiScaledX,
        dpiScaledY,
        dpiScaledW,
        dpiScaledH,
        SWP_NOZORDER | SWP_NOACTIVATE
    );
}

void Window::SayHello()
{
    if (hLabel_) {
        SetWindowTextW(hLabel_, L"Hello Win32!");
    }
}
最後,來清理 WinMain.cpp,把 WinMain.cpp 的內容修改如下:
#include "pch.h"
#include "Window.h"

using namespace winrt;
using namespace Windows::Foundation;

int WINAPI wWinMain(
    _In_ HINSTANCE hInstance,
    _In_opt_ HINSTANCE,
    _In_ LPWSTR,
    _In_ int)
{
    init_apartment(apartment_type::single_threaded);

    auto window = std::make_unique<Window>(hInstance, L"MainWindow", L"Window");

    MSG msg;
    while (GetMessage(&msg, NULL, 0, 0)) {
        TranslateMessage(&msg);
        DispatchMessage(&msg);
    }
    return (int)msg.wParam;
}
編譯執行:

完整的範例程式碼:https://github.com/riddleling/HelloWin32
結語
目前微軟的教學文件裡是用「Windows Desktop Wizard」來建立 Win32 桌面應用程式專案,但我認為現在如果要開發新的 Win32 桌面應用程式,使用「Windows Desktop Application (C++/WinRT)」來建立專案會是比較好的選擇,C++/WinRT 提供了 UWP API 的 C++ 語言投影,所以能用 Win32 結合 UWP API 的方式來撰寫桌面應用程式。
不過,或許有人會覺得奇怪,都西元 2022 年了,為何還要用 Win32 來寫桌面應用程式呢?
我覺得 Win32 目前還是有它的優勢在,特別是當你想建立記憶體使用量很小的應用程式時 (例如:常駐程式)。或是想用 UWP API 提供的功能寫一些很簡單的小工具,這時用 Win32 來寫 GUI 的部分或許會是不錯的選擇。